Hey there coffee lovers, here are a couple more reasons to love coffee! I always wanted to decorate with old coffee sacks. They bring a certain texture, depth, and authenticity to a room. While in Kona last month, I searched high and low for coffee sacks from each plantation I visited. I loved the idea of have a keepsake from my trip and incorporating it into my everyday decor. I needed a serving tray for my morning coffee so I had visions of creating a tray from my coffee sacks. When game time approached, I chickened out. I just couldn't bear to cut up my sacks! So, back to the drawing board... after staring at the sacks for awhile I thought to myself "hmm, self you can make that." Read on for a tutorial on how to make your own faux coffee sacks and make a serving tray from a picture frame, as well as many other inspiring coffee sack creations...
These are the coffee sacks I brought back from Kona...
Aren't they pretty? Can you see why I am having a hard time committing to a project for them? Check out these coffee sack creations... Which one do you think I should commit to?
I'm digging this pretty bulletin board,
 |
| design*sponge |
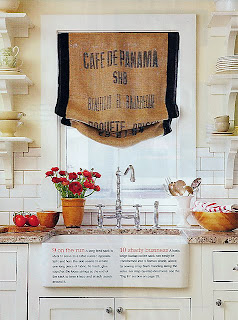
and this clever roman shade.
 |
| BHG found at Red Door Home |
Or to incorporate it more permanently like on a headboard...
 |
| re-nest |
Or a couch,
 |
Or something like this beautiful chair,
 |
| Sacramento Street |
Or how fun would it be to make these stockings for the holidays?
 |
| maya*made |
or a fun cup cozy,
 |
| green feet |
And then there's Manilla Extract beautiful hand bags. Save the sacks and let Manilla Extract do all the work. :)
 |
| Manilla Extract |
Inspired yet? Wish you had a couple spare coffee sacks lying around? If you don't have any or you have commitment issues like I do about using them, just make your own! You can block print your own burlap to use for your projects. Here's how to do it...
Supplies:
Picture Frame
Burlap
Freezer Paper or stencils
Fabric paint, or even acrylic
I bought a $5 picture frame and a half yard of burlap from Walmart. If you have extra picture frames hanging around (hehe), and they are the size you are hoping for, just snag them and save the $5. It could be fun to scavenger hunt at thrift stores for unique ones too.
Next I used my Silhouette to cut out my wording and design out of freezer paper (shiny side on the back)...
Then I ironed my freezer paper stencil onto the burlap. The shiny side of the freezer paper adheres to the material so my paint doesn't bleed.
Next up... paint!
Let it dry, and then peel the freezer paper off.
 |
| Yeah, I know in my excited haste I forgot to peel off the "A" No worries, I fixed it later |
Now to frame it! Never thought I'd be framing burlap for ripping off coffee sacks.
Yay! I have a tray! I needed this for my kitchen counter. I wanted something to store all our french press, grinder, and coffee on. And when we have guests I'll put out creamer and sugar on it too.
Now, if you want to move your tray more than I do, you might need to reinforce the backing depending on how secure the back of your frame is. Mine is in there really tight so I don't worry about it falling out, but you want to double check!
So, now that I have a tray, what do you think I should do with my real coffee sacks?


